One of the most important things when staying outdoors is the ability to stay warm, dry and have a place to cook food or even purify your water.
I am not talking about going out for a short day hike but when you are actually spending a couple of days ‘roughing it’ while camping. It doesn’t matter if you are ‘Car Camping’ or hiking several miles to a remote camp site the basics are the same.
You need a fire! Well you might not actually need one and depending on where you are camping you might not even be allowed to have one, but I am making the assumption that you are allowed and that you do need one.
Now first and foremost when dealing with fire, safety is the most important thing. Never light a fire in an area or under conditions where it might get out of control.
What does that mean? Well in most established camp sites that permit campfires that is in a fire ring and it looks like this
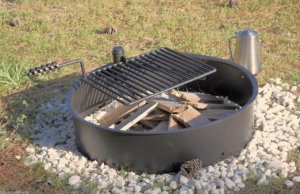
In other sites it may be a little more rustic or natural and look like this

or you could bring you own portable one
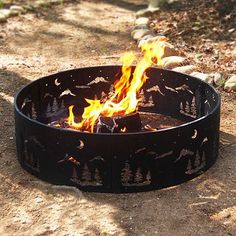
Regardless of which one you use – please USE one!
Along side of your fire you should have a bucket of water ready to douse the fire if the need arises. Another good item would be a small shovel to throw dirt over the fire.
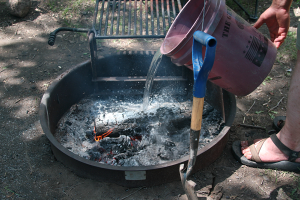
You should never leave your fire unattended or even smoldering when no one is at the camp site – if you need to leave the campsite extinguish the fire completely. The last thing anyone wants is to start a forest fire or burn down their campsite.
Ok, now that we have that covered how do we create/build/set/lay a campfire?
So what does it take to create a fire? Well every fire requires 3 things to be successful
- A heat source
- Fuel
- Oxygen
So lets discuss what that means –
a heat source is simply anything you can use to generate the initial spark – most simply that can be done with a match, a lighter, a ferro rod, etc. ….
the fuel source is most cases will be either wood or charcoal
and finally oxygen, the fire needs to breath in order to live
Seems easy enough, right? So why are there so many articles and youtube videos on the subject – simple enough, its not always that easy.
Most hikers or campers will carry either a lighter (or two), a ferro rod and/or matches so a heat source in general is not a problem (unless it rains!).
Next comes fuel, and this is where most of the problems begin. I am going to focus on wood as being the primary source of fuel for a campfire. The issue in general is that fuel comes in many sizes, logs, sticks, twigs, kindling, tinder, shavings…. etc. etc. etc.
Most camp stores will sell you logs for your campfire, they may also have kindling sticks and fire starters which makes the process of getting the fire going a whole lot easier.
Note: in a lot of state parks you can only use wood bought from the camp store. This is done in an effort to control the spread of pests that could destroy the forest – the Asian Long Horn Beetle is one.
Ok, so now we have 3 sizes of fuel, how do we create the fire using those?
Simple question you would think, but there are as many ways to build a fire as there are people doing it. My goal is to keep it simple and I will go over a very simple method that I show to Cub Scouts.
First thing we do is separate our fuel into piles organized by size, typically we create a tinder, kindling and main fuel pile, seen below:
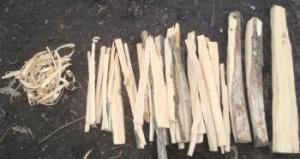
The tinder pile should be dry, light and fluffy, think ball of yarn or cotton wool. In the example above we used wood shavings as tinder. My basic rule of thumb in order for tinder to qualify as tinder it needs to be able to ignite with a spark or flame in less than 5 seconds – if it takes more than 5 seconds then it is kindling or fine fuel.
The kindling pile created by splitting the fuel down into smaller sticks, we used a small camp axe for this.
The fuel came from the camp store, it was pre-cut and seasoned (kiln dried).
Now for the actual fire layout, I use two designs primarily as they are easy to remember and easy to build.
The first is the Tepee Method and as the name suggests it looks like a tepee.
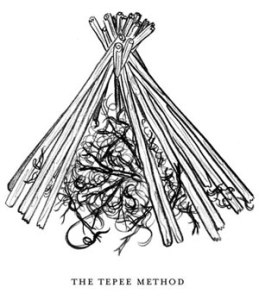
Place your fire starter in the center of your fire ring, make a mound of tinder over the fire starter, now use your kindling (pencil sized) to make the tepee structure around/over the tinder mound (see above) – leave a small gap so that you can ignite the fire starter. As the fire starts to burn add more kindling (thumb sized) to it. Once they start to burn you can begin to add the larger fuel (logs) and your fire is now underway! This type of fire burns upward and pretty quickly so be careful – it makes good coals for cooking over.
The second is the Log Cabin method and looks like this
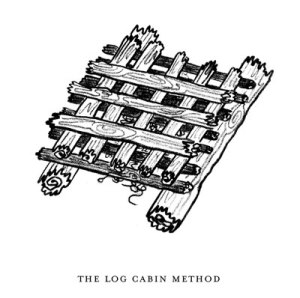
This one is fairly easy to create – you start by placing two larger logs (ankle width) about 10 – 12 inches apart. Next you place your fire starter, tinder and kindling (tinder bundle) in between the two logs (fuel). Now we add more kindling or small logs (no bigger than thumb sized) across the gap and covering the tinder bundle below. Leaving a 1 to 2 inch gap between each stick so that air can flow. Note: make sure that you will be able to reach the tinder bundle once the cabin is built so that you can ignite it. Now crisscross larger sticks/kindling over the first layer, still keeping an ‘air’ gap to allow the oxygen to flow and feed the fire. Now you can light the fire, as the kindling begins to burn you can add larger fuel, if the kindling looks like it is burning up before the larger fuel has caught fire add more kindling. This is also a good fire to generate coals for cooking.
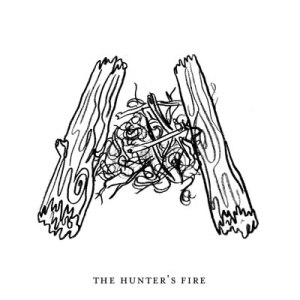
So that is basically it for creating a simple campfire and you can use those two methods in combination to make other fire lays such as the Hunter’s Fire, seen below, start with a Tepee and add two large logs either side. These logs can act as a wind break or as a platform to add a grill over the fire for cooking.
I hope you have found this article helpful and of some use.
Random Thoughts!
Disclaimer: This is by no means a complete list nor is it a definitive list, it should be used as a guideline for what can be done. Ultimately the method you choose should be something you are comfortable using. The methods listed here are ones I have used and like but that does not mean they will be right for you.


